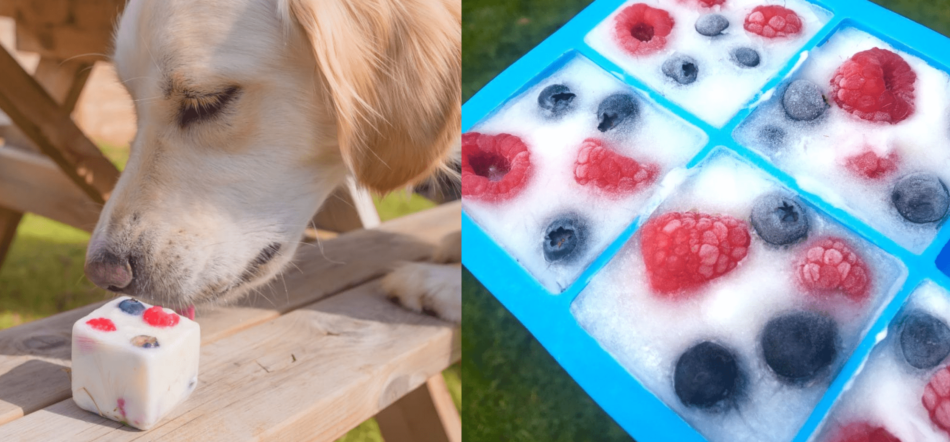
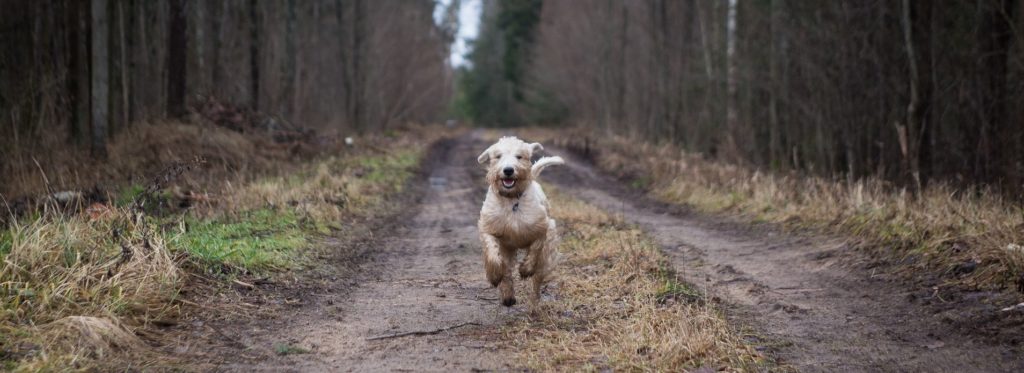
Try out these delicious homemade frozen treats that dogs will go crazy for! These are super quick and easy to make, and kids will love getting involved with different fruity creations…
You will need…
An ice cube tray – (moulds to make larger ice cubes are available on Amazon)
500g Greek Yogurt
200ml of water
A selection of dog-safe fruits, such as apples, bananas, blueberries, mango, peaches, raspberries, strawberries, and watermelon.
We used an ice cube tray which makes large 2 inch square ice cubes. This quantity made approximately 8 at this size ice cube.
Method
Prepare the fruit and cut up into smaller bite size pieces.
Depending on the size of ice cube tray, fill the molds up to a third high with yogurt, followed by a small splash of water. Pop a few small pieces of fruit into the moulds, before continuing to fill the molds with yogurt, splashes of water up and pieces of fruit up to the top.
Pop in the freezer for at least 4 hours depending on the size of the ice cube moulds.
Allow the treats to thaw for 5-10 minutes before feeding to your dog.
Other Frozen Treats…
If your fruit bowl contents are on their way out and unlikely to be eaten by the humans in the house, you can also freeze cut up pieces of the fruit, like apples and bananas, to give to your four-legged friends directly.
Don’t forget!
Remember to give your dog treats in moderation, alongside a healthy diet. Supervise your dog when eating these frozen treats and remove at any sign of distress. These frozen fruit cubes should be given to your dog as a treat, with other solutions in place to keep your dog cool, such as access to shade in the garden and the coolest room in the house, fresh water, walks at the coolest time of day etc. Consult your vet if your dog is showing signs of distress or potential heatstroke.
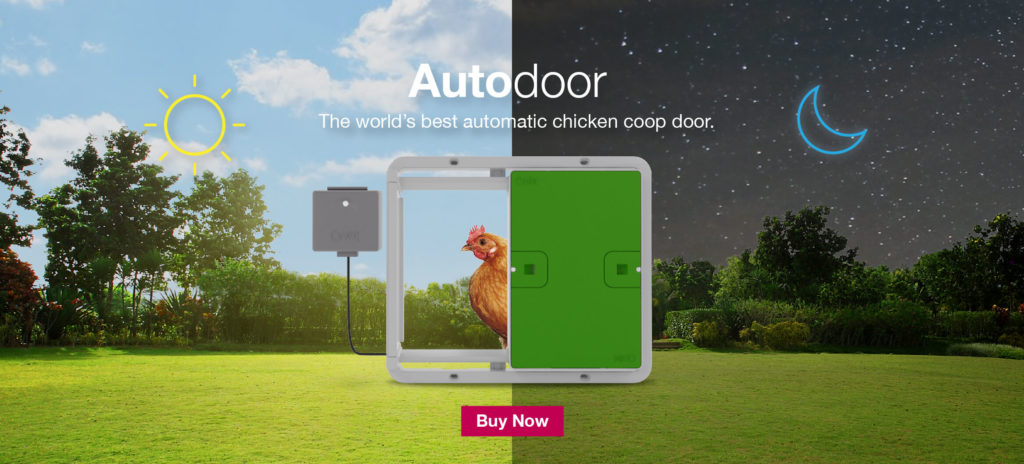
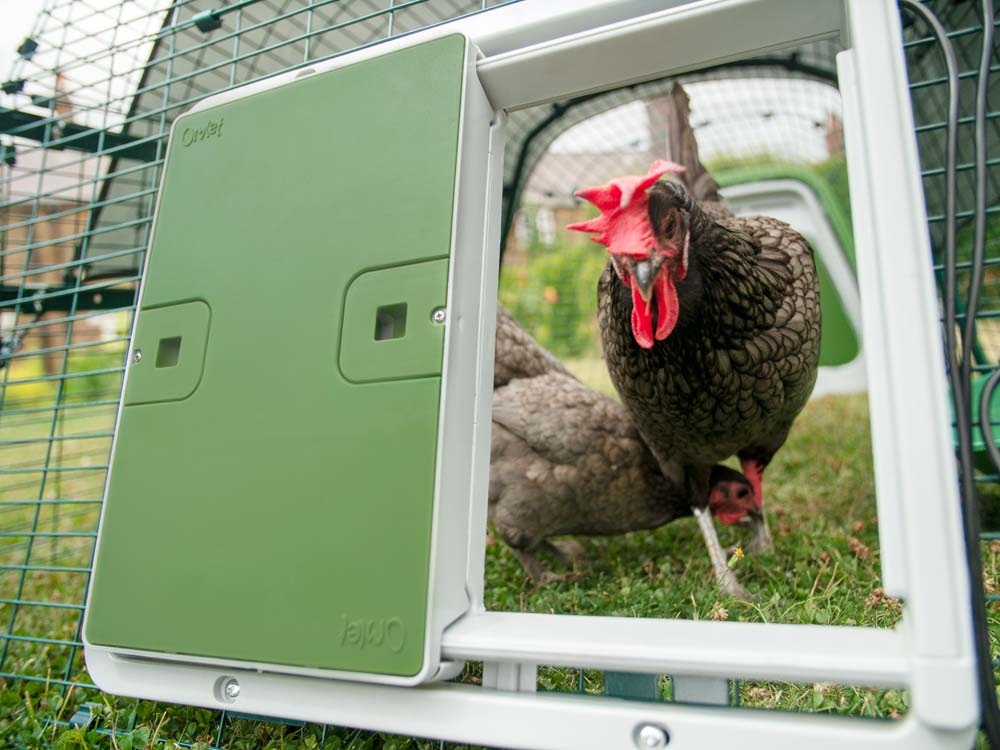
Did you know that over 60% of chicken keepers aren’t getting enough sleep?! Omlet has the solution as they launch the New Automatic Chicken Coop Door.
In the last decade chicken keeping has become a hit with families wanting a slice of the good life, propelling hens into the top ten list of pets. The reasons are clear: a supply of fresh eggs that’s the envy of your friends as well as teaching children important lessons of where their food comes from suggests that chickens really are the ultimate pet.
However, a recent survey found that over 60% of chicken keepers wish they could spend longer in bed in the mornings with many admitting they would be willing to pay up to $400 for a solution that could prolong their lazy mornings in bed! 1 in 6 couples even admitted to regularly arguing about who should let the chickens out. What will save the country’s chicken keepers from tiredness and possibly even divorce?
Introducing the brilliant new Automatic Chicken Coop door opener from Omlet. Designed to work with the best-selling Eglu Cube as well as any wooden chicken coop. Omlet’s Automatic Chicken Coop Door Opener is battery powered and combines both a timer and a light sensor, giving you the ultimate flexibility and control.
Omlet’s Head of Product Design, Simon Nicholls, said: “We know our customers love their chickens and always want the best for them, that’s why we designed the Autodoor so that the hens could get up when they want, which can be quite early in the summer. It was also important to ensure that it works as well at closing the coop at night and in all weather conditions too, so we carried out extensive testing in several different countries over 2 years to perfect the design.”
The unique integrated frame and door design comes with everything you need to attach it to your chicken house or run and has been tested to work down to -20 deg C. Like a personal chicken coop concierge, the Autodoor will always make sure your chicken’s coop is securely closed at night even when you’re running late.
Sharon Burton, who has kept hens for 4 years in Oxford, believes the Autodoor has even saved her marriage! “There’s nothing I wouldn’t do for my chickens. I buy them the best food, I sprinkle dried flowers in their nest box to keep it fresh, but I always felt guilty if I didn’t hop straight out of bed at the crack of dawn to let them out and whenever I asked my husband Paul to do it he would pretend to be asleep! When Omlet asked me to test the Autodoor I was delighted, it’s saved my marriage!”
Calling all wicked Witches! We know October has been a very busy month for you all, which is why we are offering 31% off when you upgrade your witch’s broomstick this Halloween, to the Omlet Chicken Perch. This spooktacular offer will fly past, so don’t miss out!
Use discount code WITCHES until midnight on the 31st of October!
Give your chickens a brilliant new way to play in their chicken run with Omlet’s Chicken Perch, available in 2 lengths to suit your flock. The naturally weather resistant perch not only features an innovative bracket design – allowing it to be placed anywhere on any chicken run – but is also suitable for use by all breeds of chicken, making it the new must-have DIY chicken coop accessory!
Upgrade your chicken’s playtime with this fun accessory, and use code WITCHES to save 31% until midnight tomorrow.
Terms and conditions
This promotion is only valid from 30/10/19 – midnight on 31/10/19. Use code WITCHES to claim 31% off Chicken Perches. This offer is available on the Omlet Chicken Perch 1 metre and 2 metre only. Subject to availability. Omlet reserves the right to withdraw the offer at any point. Offer cannot be used on delivery, existing discounts or in conjunction with any other offer.
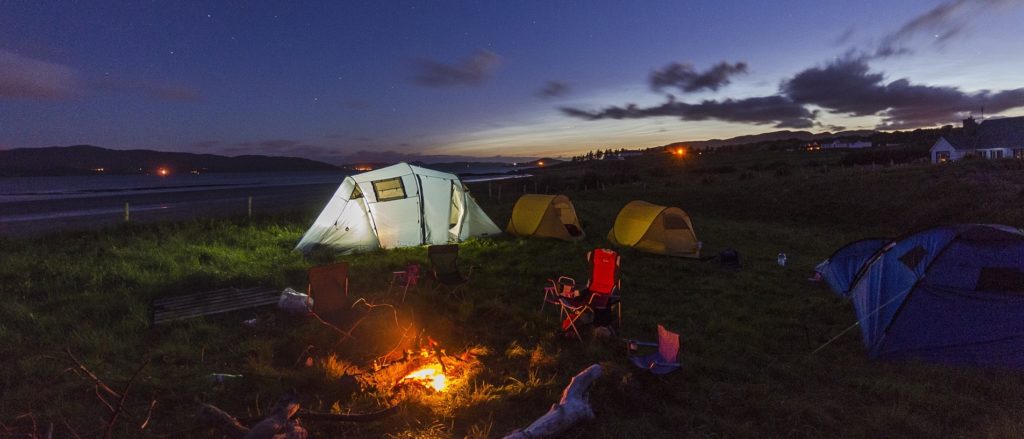
Hitting the great outdoors on a doggie camping trip is a great idea… in theory! But what if the dog keeps everyone awake all night, barks endlessly at a field full of strangers, and runs off at the first whiff of someone else’s barbecue?
The fact is, some dogs are born campers, while others tend to get frustrated or freaked out. Our ten dog camping tips should help you find the right pitch for you and your canine companions.
1. Think about your dog’s personality.
A chilled-out dog who enjoys lying down after a walk just as much as he enjoys the walk itself will probably love camping. So will a sociable hound who likes meeting other dogs and new people. On the other hand, a skittish, nervous or aggressive hound will find it all a bit stressful. That doesn’t mean you can’t go camping with a less sociable dog. If he’s always aggressive to strangers, it’s best to forget it; but otherwise you just need to do your campsite homework. Somewhere small and quiet might work better than a busy camping village at the height of the season.
Having said that, many well-trained dogs are able to tolerate the hustle and bustle, as long as they also have the opportunity to get away from it all on regular walks.
2. Research the camp sites before setting out.
Lots of places do not allow dogs on site, and many more have a ‘Dogs on leads at all times’ policy. The ones that do encourage dogs tend to be very proud of the fact, boasting of their dog-friendly facilities. The non-dog-friendly ones outnumber the others, so do your homework.
3. Take all the dog accessories with you.
You’ll need food and water bowls – including light, portable dog bowls and water bottles for hikes and day trips – food, leads, harnesses and muzzles, poo bags, beds, towels, favourite toys, tick- and flea-collars, tick-removers, and anything else that will ensure a trouble-free trip. You might want to consider a light-up dog collar too, for those dark nights.
4. Don’t forget the dog ID.
In case of emergencies, or AWOL dogs, you should have all your pet’s details on a dog ID tag, or printed out (and laminated, ideally – wet camping trips can soon make slips of paper illegible). This includes vet’s notes and vaccination record, and contact info. Your dog’s microchip records need to be up-to-date too.
5. Settle in.
After the journey, before doing anything else, let your dog acclimatise. He’ll need a wee and will enjoy a good, long walk around the immediate area to get used to the sights, sounds and smells of his new surroundings.
6. Keep your dog under control.
You don’t want to be looking over your shoulder every other second to make sure your dog isn’t making a nuisance of himself in the shower block or attacking the neighbours’ sandwiches. Unless your pet is very well-trained indeed you’ll need to put him on a lead – a long one, if space allows – tied to a ground spike or tree. That way he can nose around without sneaking off while you’re not looking. You could also take atravel dog crate with you, if your pet has been crate-trained. Doggie tents are available too.
7. Clean up.
Take poo bags to dispose of your dog’s trips to the toilet. Remove all food bowls and dog toys after they’ve been used, to prevent other dogs sniffing around and potentially leading to doggie disagreements.
8. Discourage the woofing.
If your dog is barking, distract him or move him somewhere else to take his mind off whatever has been winding him up. A walk is ideal. Remember that children and many other people on campsites go to bed early, so impose an 8 o’clock woofing curfew. This may involve taking the dog into the tent or crate and encouraging him to settle down for the night.
9. Go easy on the snacks.
It can be tempting to feed your dog lots of picnic and barbecue leftovers, or to overdo the treats due to his good behaviour in strange surroundings. Too much food can upset a dog’s stomach, which means nasty doggy smells at best, and runny poos at worst. Limit Fido to his usual food, with just the occasional treat – and make sure he doesn’t make lots of new ‘best friends’ on the campsite based on the fact that they feed him their leftovers!
10. Enjoy yourselves!
A simple but vital point. Treat the trip as a holiday rather than a trial. The more relaxed you are, the more relaxed your dog will be.
Once your dog has caught the camping bug, he’ll relish the trips every bit as much as you do. And those happy family holidays with the dog become cherished memories when you look back over days gone by.
Rabbits will most likely not show any signs of illness or pain before it is really serious, as any weakness would mark them as an easy target for predators in the wild. It is therefore important that you, as an owner, carry out regular health checks on your pet, so that you are able to spot potential problems while they are still treatable.
Always take your rabbit to the vet as soon as you suspect something is not right. A rabbit’s health can deteriorate very quickly, so don’t lose any time wondering if it’s worth it or not.
Body
Put a towel on your lap and place your rabbit on top of it. Stroke him or her to calm them down. When your rabbit has settled, you can start examining their body.
Feel the stomach to make sure it’s not swollen or distended, and go through the rest of the body for signs of cuts, bruises or lumps. Feel the muscles in the legs, they should be strong and firm. Any wincing or unexpected movement from the rabbit could be a sign that the body part you’re touching is causing your rabbit pain.
Check your rabbit’s breathing; it should not be laboured. Wheezing or clicking noises from the lungs can be signs of illness.
It is worth getting a set of scales and regularly weighing your rabbit. Sudden weight loss is a serious sign of illness, and a lack of appetite is a strong indicator of poor health.
Mouth and nose
The nose should be dry and not have any discharge. Check that the rabbit is not dribbling, and that it doesn’t have any sores or cuts around the mouth. The gums should be pink (a red or purple colour is a sign of illness).
Make sure the teeth are not overgrown or damaged. They should also be growing straight, and be uniform. You won’t be able to see the back teeth, but if you move your fingers over the cheek you can feel for lumps, and make sure that everything is symmetrical. Overgrown teeth are a serious problem as this can prevent your rabbit from eating, which is why it is very important to give them plenty of good quality hay to wear the teeth down with.
Eyes
Check your rabbits eyes to make sure they are clean and clear. You shouldn’t see any discharge or dirt. If you do, carefully pull back the eyelid to see if you notice any redness or pus in the eye; it is possible that the rabbit has scratched its eye. The eyes should also be dry; runny eyes can be a sign of teeth problems, or possibly ingrowing eyelashes or blocked tear ducts.
Ears
Rabbit ears should be free from any dirt, wounds, lumps, wax, discharge or parasites. Look inside the ears; you can use a torch if it’s difficult to see. Take extra care if you have a lop rabbit as they are particularly prone to abscesses around the ears. Carefully massage the base of the ears, where lumps can sometimes occur.
Feet
Watch your rabbit move around to make sure it’s not limping and doesn’t have any lameness in the legs. Pick up your rabbit and put him or her on your lap. It’s not a good idea to put a rabbit on its back, so hold it against you with one hand under its bottom. Try spreading the toes to check for scabs, abscesses or a build up of dirt. Also check the heels on the back feet. These should not be red or swollen. Check the fur on the feet and brush it if it’s matted.
Rear End
Check the fur around the bottom. It should be completely clear from faeces or other dirt. A dirty bottom can be a sign that the rabbit’s diet is too rich and that they are not eating all the caecotrophs they produce.
During summer you should check for any build up of dirt at least once a day, as a dirty bum can attract flies that lay eggs in the damp fur. This causes a condition known as flystrike, which can kill a healthy rabbit in a matter of days.
Also check the rear end for any swelling or redness.
Coat
With your rabbit sat on your lap, part the hair with your fingers and check for cuts and wounds, bald patches, anything moving, small brown dots or white flakes.
Even if you don’t have a rabbit that requires grooming on a daily or weekly basis it is good to get your pet used to brushing from an early age. Rabbits moult regularly, and you might need to help them get rid of dead hair from their coat during this time.
Changes in temperament
Sudden changes in temperament and behaviour is never a good sign. Maybe your rabbit doesn’t come running when you approach it with food in the morning, or is suddenly aggressive. These might be signs your rabbit is in pain.
Rabbits who reach sexual maturity can sometimes act very differently. Spraying is a common problem, as is aggression. Your rabbit might not be in pain, but it can be very distressing for them to go through this ‘puberty phase’. This might be a good reason to get your pets neutered as soon as they are old enough.
As long as your chickens are laying and there’s a cockerel in your flock, you can hatch and incubate chicks all year round. However, traditionally the most popular time to breed your own chickens is in the spring. Hatching and rearing your own chicks from eggs is an incredibly exciting and rewarding process. There is nothing better than seeing your tiny chicks grow up in the knowledge that they are getting the best possible life from start to finish. The incubation period for chicken eggs is usually 21 days. The most reliable way to incubate your fertilised eggs and maximise the chance that they will hatch into healthy chicks is to use an artificial incubator. Here’s our step-by-step guide to hatching chicks:
1. Long Term Plan
Before the hatching starts, you will need to have a plan in place as to what you are going to do with the chickens once they hatch. It is a safe estimate that 25-50% of eggs will not hatch due to either not being fertilized or due to some mishaps during incubation. Among those which will hatch, approximately 50% will be cockerels and 50% will be hens. Everybody wants hens and hardly anyone needs cockerels, so there is a question of what to do with the latter. In many breeds, cockerels do not tolerate each other and they will fight vigorously unless they are completely separated.
2. Eggs
First of all, you need to be as sure as it is reasonably possible that the eggs are fertilized, so getting them from a good breeder / farmer is crucial. Eggs of some breeds are quite expensive, so every egg that will not hatch costs you money. A breeder can never give you a 100% guarantee that the egg is fertilized, but an experienced one can be quite confident they are.
The eggs should not have any deformations or bear any other visible defects. Any cracks in the eggshells are a no-go. Any defect of the eggshell might result in the chick having difficulty in hatching, being deformed, or not developing at all.
Once you have the eggs, it is a good practice to wash them with an egg disinfectant. Eggs are porous and the embryos get oxygen and water through their eggshells. If there are any toxins or bacteria on the eggshells, that might endanger the embryos.
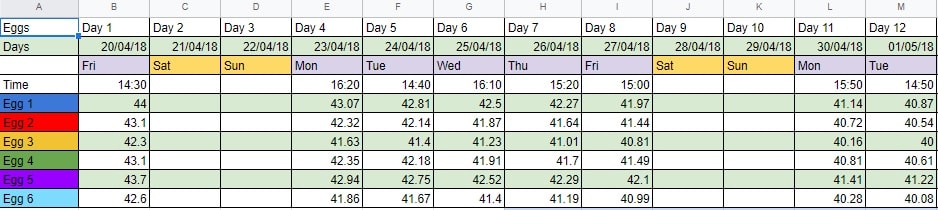
3. Keep a Diary
It is a really good idea to keep a diary of hatching. This includes numbering the eggs and keeping a daily record of each eggs weight. A developing egg will gradually lose weight in its 21 days of incubation. It will lose about 10-15% of its original weight over time. When the egg in the incubator is not losing weight it usually means it is not developing.
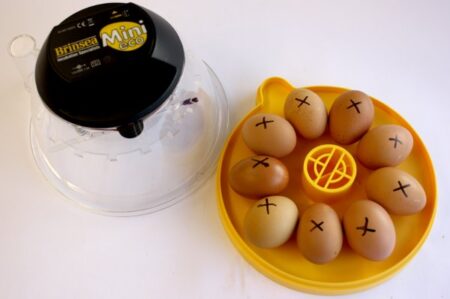
4. Incubator
Turning
Choose your incubator carefully. Some incubators, such as the Brinsea Mini II Incubator have an Auto-turn mechanism built-in. Auto-turn saves you a lot of time and effort. Every egg during the incubation time needs to be turned every 90 minutes in order for the embryo to be positioned perfectly in the egg. A broody hen naturally turns all the eggs she is sitting on as she moves around the nest, so the turning simulates what naturally happens when a hen takes care after eggs. If the incubator does not have the Auto-turn option, you will need to turn the eggs manually. It is therefore a good practice to mark all eggs with a non-toxic marker just to be sure that every egg is being turned every time you visit them.
Temperature control
A good incubator will be able to keep a steady temperature within. One that we recommend is the Brinsea Mini II Incubator. The optimal temperature for hatching chicks is 37.5 degrees Celsius. A good incubator will set its alarm off if the temperature within drops below or rises above a certain threshold. Temperature in the room where the incubator is placed is crucial here, as it heavily influences the temperature in the incubator. You will be opening the incubator during routine controls of the eggs, so it is really important the eggs don’t get a temperature shock in the process – such a shock might kill the fetuses. We advise keeping a steady temperature of approx. 25 degrees Celsius in the room with the incubator. The room should also be draft free.
Humidity control
A good incubator will be able to provide a good humidity inside. Optimal humidity for the eggs during hatching is around 40-50% but needs to be increased on Day 19 in order to soften the eggshells and help the chicks to hatch out. With some Incubators such as the Brinsea II Mini Incubator, there are two water containers inside. Fill one up every day, and fill both of them from Day 19 onward. You can fill up the water container in the Brinsea without the need to open it which is very useful, since you generally don’t want to open the incubator too often. It is perfectly normal that some condensation starts to build up in the incubator after a few days due to high humidity.
5. Daily routine
Cooling
Day 7 is an important threshold. First of all, you need to start cooling the eggs for half an hour a day. It’s best to do this around the same time each day. A good incubator has a fan and you can set an automatic cooling time. If not, you need to cool the eggs down manually by taking them out of the incubator. The cooling temperature should not be shockingly different – a difference of 2 to 5 degrees Celsius will do.
Developing eggs keep their own temperature when exposed. That is how a hen tells the difference between a developing and a dead egg. When the hen gets off the nest to eat and drink, the dead eggs will go cold almost instantaneously. The hen will then get rid of the dead eggs from the nest.
Candling
You also need to start candling the eggs on Day 7 at the latest. Candling will show you which eggs are developing and which are not. If an egg does not show any signs of development on Day 7, it will not hatch. It is essential to take out any eggs which stop developing as they will start to decompose if left in the incubator. From Day 7 onward you should continue candling on a regular basis. It’s not necessary to do it every day, as you won’t see any significant progress on day-to-day basis, but it is a good practice to do it every third or fourth day. Weighing and candling combined are usually good indicators if the egg is developing or not.
From Day 7 up to Day 19 tasks should continue in a routine manner: daily cooling, weighing, and occasional candling.
6. Hatching
Day 19 marks the next important stage. You need to stop turning the eggs and cooling them, and lay out a hatching mat in the incubator (so the chicks won’t slip on the incubator’s surface on their first day of life). You also need to increase the humidity inside up to at least 65%. When using the Brinsea Mini II Incubator you can achieve this by filling up the second water container inside.
At some point during that period the eggs will start wiggling: the chicks will be moving around the egg to position themselves perfectly to hatch out. You might feel the temptation to check on the eggs often, but at this time it is best to leave them be and inspect the eggs every 6 hours or so.
Around Day 20 the chicks should peck out a small hole in their eggshells to catch their first breath of fresh air. It’s best to leave them be. Do not help them by making the hole bigger or breaking the shell apart. They will do it themselves in their own time. In that time they will also consume all the nutrients in their eggshells, so it is vital for them to stay inside for the time being.
Most of the chicken breeds hatch on Day 21 with only a handful of breeds hatching on Day 20 or 22. Do not help the chicks in hatching, they should be able to do it themselves – it’s their first test of strength. Only give a helping hand when a chick is really late (in comparison with its companions in the incubator) and/or the eggshell is really thick and the chick is evidently struggling to get out for a prolonged period of time.
Once the chicks hatch out, leave them in the incubator for another 24 hours. They should be well fed having eaten all the nutrients from their eggs. Apart from that, the incubator provides them with the optimal temperature and humidity.
Now watch our eggcellent egg hatching video to see how easy it is to hatch chicks!
To celebrate, we want you to nominate someone you know who has always dreamed of collecting fresh eggs from their own chickens every day. We will be picking one lucky winner to receive an eggcellent prize – the amazing Eglu Go Chicken Coop with 2m run!
To enter, head over to our Twitter page, follow us and reply to the World Egg Day tweet with the username of the person you want to nominate.
Good luck!
Terms and Conditions
The competition closes at midnight ACT on the 13th of October 2019. To enter please comment on the World Egg Day tweet on the Omlet Twitter page – you must also be following the page. One winner will receive an Eglu Go Chicken Coop with 2m run. The winner will be randomly selected from all entries worldwide and notified within 7 days of the competition closing. If the winner does not respond to claim the prize within 7 days of notification, we reserve the right to withdraw the prize from the winner and pick a replacement winner.
Omlet reserve the right to withdraw or amend the competition at any point. Prize cannot be transferred to cash. This competition is not open to Omlet employees or members of their immediate families. All entries must be made on the relevant competition post. The winner agrees to the use of their name and any reasonable requests by Omlet relating to any post-winning publicity.
Keeping your pets warm in winter and cool in summer is one of the best ways you can help them stay healthy. But this is often easier said than done. Traditionally chicken coops and rabbit hutches have been made from wood. This has its advantages: it’s an easy material to work with, it’s customisable and it looks attractive. However, when it comes to coping with the weather, it can leave a lot to be desired. Wood is not a very good thermal insulator, meaning if it’s hot outside the temperature will transfer through to the inside quickly.
Air as a Thermal Insulator
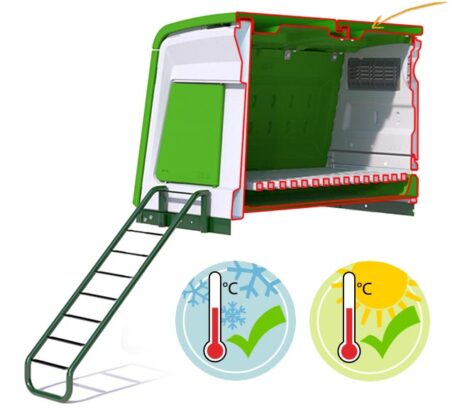
Perhaps surprisingly, a much better thermal insulator is air. But how can something so thin that you can’t even see keep our pets comfortably insulated from the elements? It’s precisely because it’s so thin that it’s so effective. Heat is conducted between an area of more heat to an area of less heat by one of three processes: conduction, radiation or convection. In conduction warmer molecules vibrate rapidly and collide with other nearby molecules passing on that energy. If the material that the heat is trying to pass through has few molecules in it then it will be harder for the heat to transfer through it. This is precisely what happens if you have a warm surface separated from another surface by a layer of air.
Because air is not a good conductor it is commonly used as an insulator in everything from buildings (double glazing, cavity walls) to cooking utensils, drinking flasks and even the high tech chicken coops.
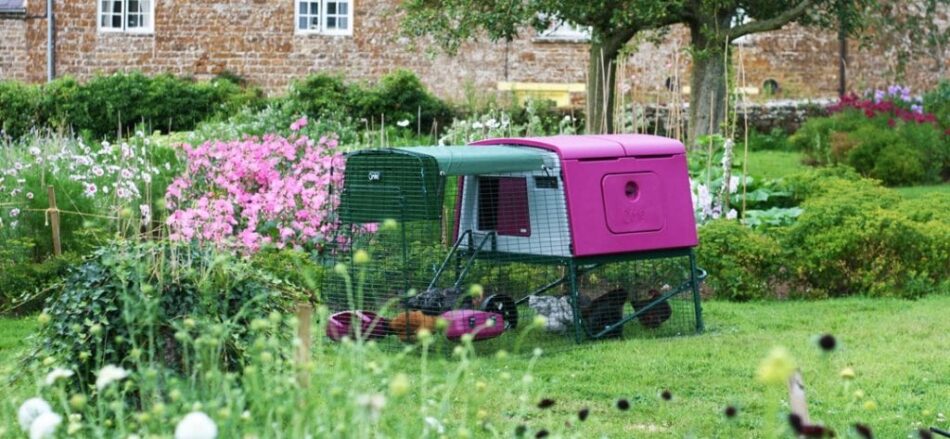
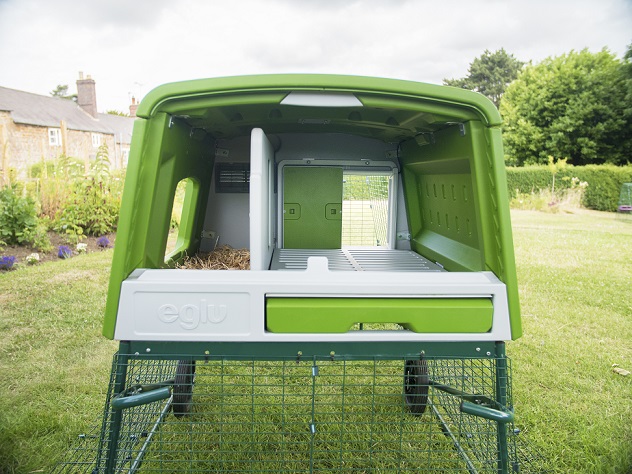
Eglu chicken coops have a unique twin wall system that takes full advantage of air’s great insulating property to keep your pets comfortable all year round. Within the walls of the Eglu is an air pocket which acts as a barrier, stopping hot and cold temperatures penetrating into the inside of the house, so your chickens can stay warm in winter, and cool in summer.
The Eglus also feature a draft-free ventilation system designed to increase the air flow throughout the coops, keeping chickens at a comfortable temperature. These air vents are discretely located around the coop, and specifically designed so they do not allow drafts over the nesting box. A well ventilated coop is not only beneficial for keeping chickens cool, but it is also extremely important for preventing your hens from suffering with respiratory issues.
For evidence of the Eglu’s cooling properties, take a look at this video showing how much slower an ice lolly melts when inside the coop…

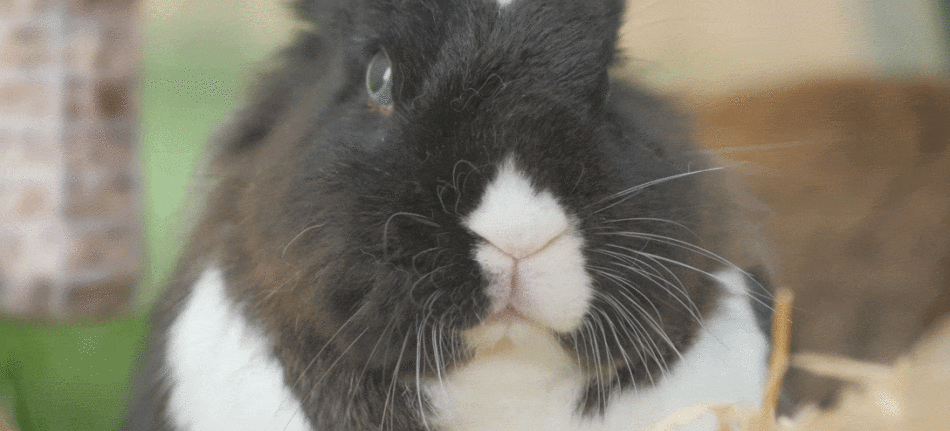
 Ears
Ears